Over the last few weeks we've rolled out a number of updates to give you that extra bit of flexibility when managing your rotas.
Here's a quick run through of what's new:
Manual Days Off

The work schedule for each employee (found in their profile pages) lets you set regular weekly days off for your staff. To go with that tool you can now manually pick days off on the Rotas page as well.
If you go to the Tools menu on the Rotas page and select "set days off" you can now click the cells you wish to mark as day off. Once you are finished hit cancel at the top of the page and your changes will be automatically saved.
Please note - if you click a cell that is already a day off in the work schedule it will remove the day off for this instance.
Days off can now also be included in the Copy Custom Range tool. So if you have a pattern of days off that extends beyond a single week, you can use a combination of the manual days off tool and the Copy Custom Range tool to duplicate this pattern weeks and months in advance. Want to find out how the Copy Custom Range tool works? Take a look at our guide.
Leave in Hours
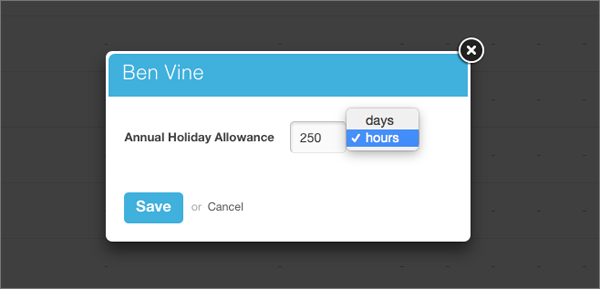
You can now add and manage an employee's leave by day or by hours. This can be done on a global basis or per employee on their profile page, where you assign their holiday allowance.
When you use hours to manage an employee's leave it sets all their allowances and totals as hours as opposed to days. Adding leave is still the same process of selecting a date range, but now you have the option of inputting how many hours this is equivalent to. Similarly, when an employee requests time off they choose the dates of their holiday, but you then set how many hours this equates to from their allowance and this is deducted from their totals.
Day Notes
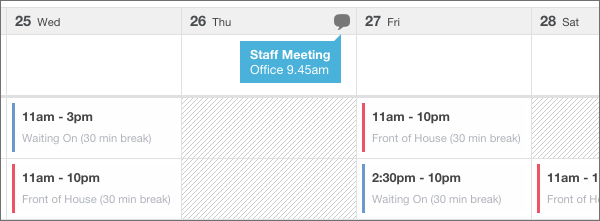
Need to mark on upcoming events? Want to give staff some extra shift details? Or need to note how many staff you need schedule for a day? You can now do all these things with our day notes feature.
To add a day note go to the Rotas page and click the speech bubble icon that appears when you hover over a specific day. In the pop up that displays select a date range for the note, a title and description, and pick the locations you want the note to display for. Next, choose whether you want to make the note visible to employees and hit save.
Now when you hover over the speech bubble icon the day note will display.
Please be aware - day notes do not get copied when you use the Copy Week tool or the Copy Custom Range tool.
Shift Acknowledgment
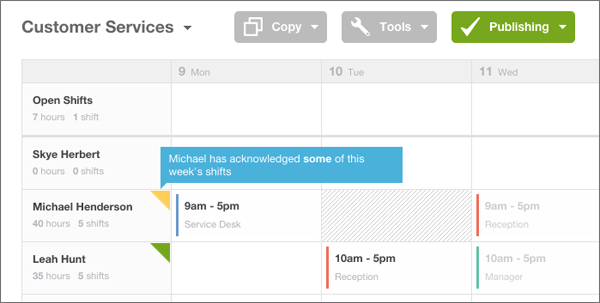
Want to keep track of when your staff have seen their shifts? The shift acknowledgement tool lets you do just that. Once activated, employees log in to view their shifts and they can then click the Acknowledge button to inform their rota managers/admins that any new shifts for that week have been seen. This information is then fed through to the admin or manager's own rota view (see above) where employees who have acknowledged their shifts will be marked with a green tag.
The tool also recognises when you make changes to shifts that have already been acknowledged. For instance, if an employee acknowledges a week of shifts, but you then change a shift time or add a note, the green marker on the employee name turns yellow until the employee re-acknowledges the update.
To activate or de-activate this feature go to your Account Settings (cog icon in the top-right corner) and under settings tick the field labelled "Enable Shift Acknowledgement", then hit save.
Grouping Employees on the Rota
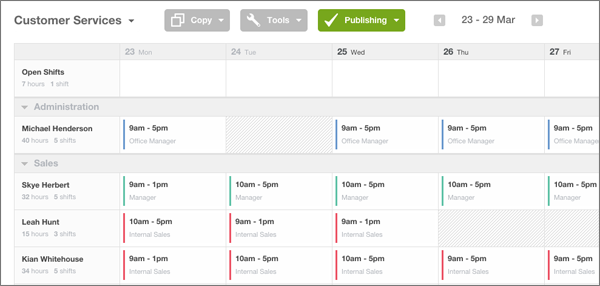
We have updated the tool for arranging the order your employees display on the rota. Now you can group your employees by their default role or by group, if you wish. To do this go to the Tools menu on the Rotas page and select "Employee Grouping".
When grouped together you can collapse or expand a group of employees, which can help make building rotas that little bit easier when you have a large workforce.
Please note grouping applies across all locations and only displays the groups that are relevant to the employees assigned to those locations.
You can also still set a custom range if you desire. Go to the Tools menu and select "Set Custom Order" and simply drag and drop employees in to the order you want them to display.
Also, if you have grouped employees prior to setting your custom order, then the custom order will reflect in the groups accordingly. For example, if you have groups where your team leaders need to appear at the top you can set groups to display on the rota first. Then use the custom order and drag all your team leaders to the top of the list and it will display them in their groups accordingly.
Quick Publish Mode, Tweaked
Last but not least...
Quick publish mode, found in the Publishing menu on the Rotas page, lets you pick and choose the shifts you want to publish. Now, when using this tool, you can click an employee's name to publish all shifts in that row or click a day to publish all shifts in that day.
And that’s it for today - what do you think? Just drop us an email or use the comments section below, we’d love to hear from you! If you’re not already a RotaCloud user, try our 30-day free trial now and test out these features, plus much more! Sign up for free.

